How to Create an RSVP QR Code for an Event
Create an RSVP page with event details and a response form, publish its QR code, and manage replies. A practical guide for workshops and invitations.
To create an RSVP QR code, publish an event page with a response form, download the QR that opens it, and add it to your invitation. Test the printed code and one submission before sharing it. In Scanely Pages, you can build the page without a separate website and read replies in your Leads dashboard.
This walkthrough uses a pottery workshop. The same approach works for a community gathering or a simple wedding invitation, where you review replies and handle follow-up yourself.
Watch an event page become an RSVP inbox
This silent walkthrough uses the Garden sessions event template in a sample workspace. The written guide below uses a pottery workshop; publishing and handling replies follow the same steps in both examples.
- Review the Garden sessions draft, including the event date, venue and RSVP form.
- Select Publish page, then open the public page.
- Send one clearly labeled demo response using your own contact details. A submission on a live page counts toward your allowance and can notify the page owner.
- Open Leads, select the response and change its status to In progress.
- Add an internal note about the next step, then select Save changes. The note stays in your workspace and is not sent to the guest.
The form records a reply. It does not reserve a seat or automatically email a guest confirmation. Review availability and contact the guest separately.
Choose where the RSVP should go
Use a hosted Page when you need event details, a photograph and a simple response form together. If you already have a Google Form, keep it and use the Google Forms QR generator for its responder link.
An add-to-calendar QR serves a different purpose: it encodes event details for supported calendar apps. It does not collect RSVP replies.
Pages supports name, email, optional phone and message fields. For custom questions, automatic guest counts, meal-choice fields, ticketing or check-in, choose an event or form service with those features and link to it.
1. Start with an event template
Open Pages in your dashboard and select New page. Under Event & RSVP, preview Make & gather for a workshop, Garden sessions for an event poster, or With love for an invitation.
Check the mobile and desktop previews, then select Use template. Give the draft a name you will recognize in the dashboard, such as "October pottery workshop".
Creating a draft uses one shared Pages and QR code slot. Previewing templates uses none. Select Save draft while working; changes are not saved automatically.
2. Add the date, venue and practical details
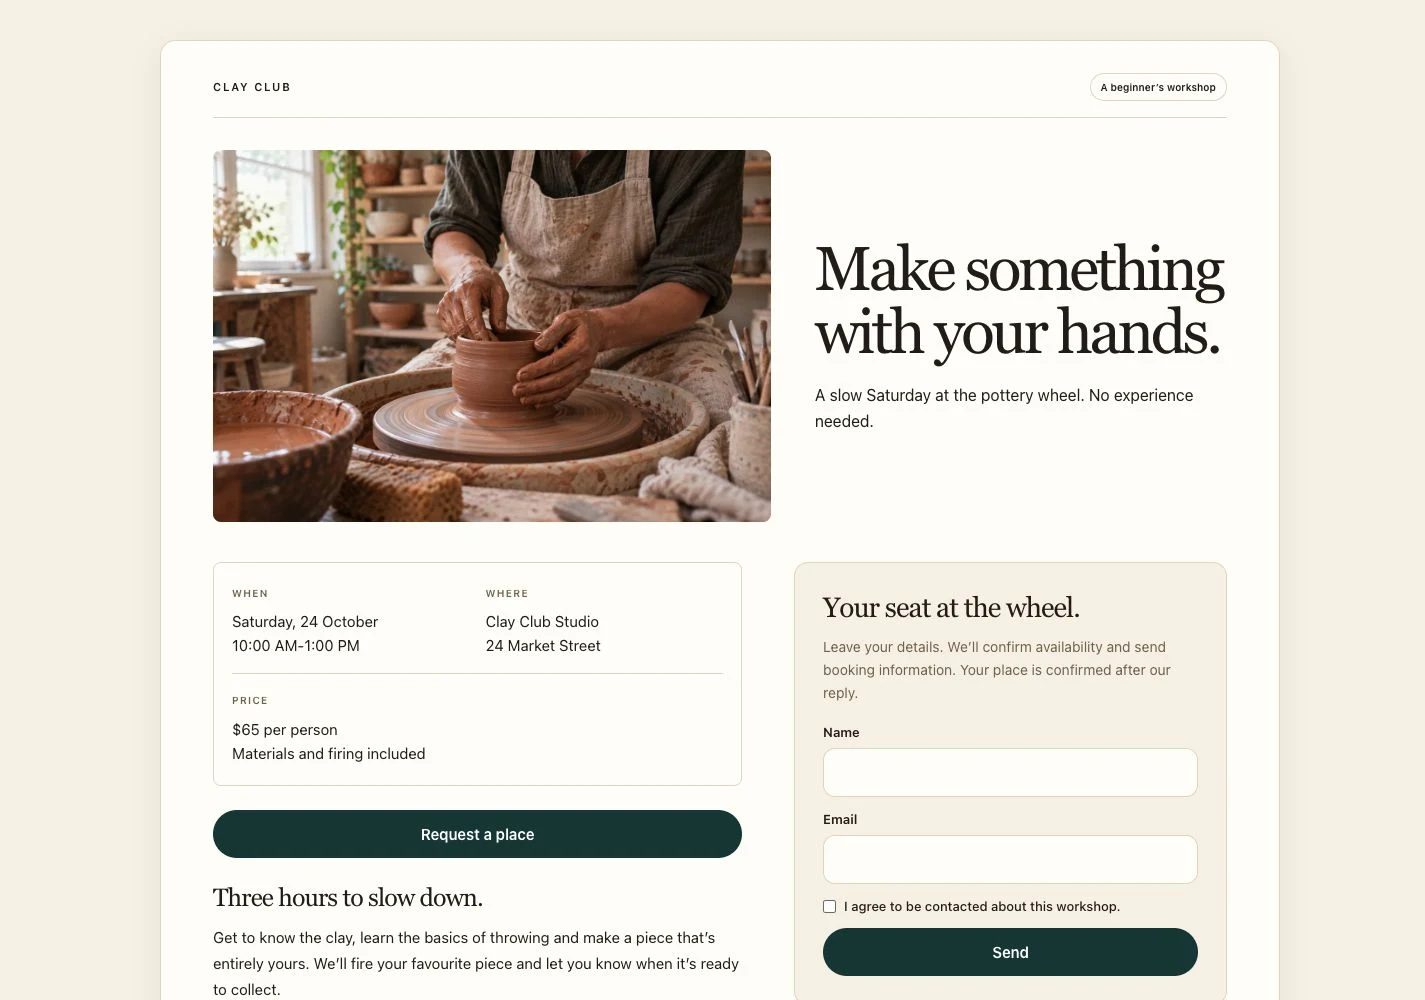
Replace the template's sample information before publishing. For the workshop, include:
- The event name and what participants will do.
- The full date, year, start and finish times, and relevant timezone.
- The venue name, street address and arrival instructions.
- The price, what is included, and how payment will be arranged.
- The reply deadline and how you will confirm availability.
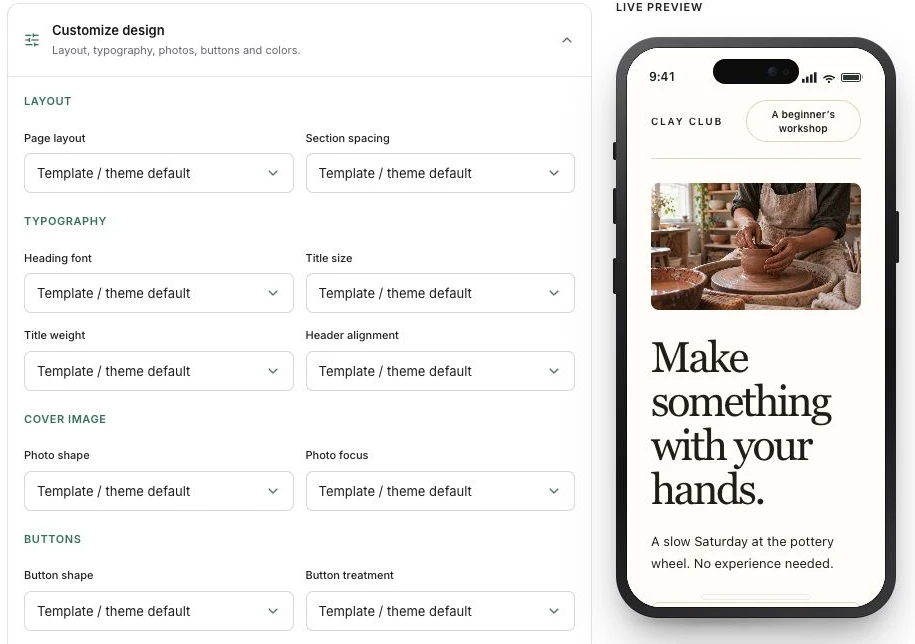
Edit the Header, Details and Text blocks. Replace the sample photo with your own, then adjust the theme and typography if needed. Keep essential information near the top so guests can understand the invitation before reaching the form.
3. Set up the RSVP form
Select the Form block and enable Collect leads. Email and consent are required. Keep Require name enabled if you need to identify replies; show the optional phone field only if you plan to use it.
For an invitation, enable Show message and Require message. Change Message label to "Will you be joining us?" and use Form introduction to ask guests to write whether they can attend. This is a written reply, not a yes/no selector.
Use Consent text to explain the event-related contact. In After submission, set a clear message such as: "Thanks for your request. We will email you with availability and booking details."
In the Buttons block, label the invitation's action "Request a place" or "Send your RSVP" and set Destination to Form on this page. This button takes visitors to the form; the form's submit button is labeled Send.
See the forms and leads guide for the available controls.
4. Publish and test a real reply
Review both screen sizes, then select Publish page. This saves the current content and makes it public. Select Open page and check the date, address, links and form wording.
Submit a clearly labeled test using your own contact details. Check that it appears in Leads, including any message you entered. A live test is a real submission: it uses the monthly allowance and can send a notification to the owner.
The success message appears on the page. Scanely does not automatically email a confirmation to the visitor or reserve a seat when they submit.
5. Put the QR on the invitation
Select Download QR for a PNG, or open QR design & scan details for SVG downloads and print tools. Put a specific instruction beside it, such as "Scan to request a workshop place".
Add a typed link or contact alternative for guests who cannot scan. Use the QR print guide to check sizing and margins, then print one sample and test it with a phone before ordering the full run. Check that it opens the published invitation and that the form is usable.
For email or messages, use Copy link so recipients can open the page directly.
Read replies and confirm the next step
Open the Page's Leads tab to read responses for this event, or Leads in the sidebar for the selected workspace. Set a reply to New, In progress or Closed, add an internal note and select Save changes to keep track of follow-up. Statuses and notes are not sent to the visitor.
The Email me new leads setting on the QR detail screen controls notifications to the page owner's account email. Paid plans, including Lifetime, provide CSV exports of all replies or the filtered set, including statuses and notes, for working with responses elsewhere.
Review requests, resolve duplicate replies, and contact guests through your own email or phone workflow. Keep confirmed places in your event records. Scan counts show access to the link, not confirmed attendance. The events guide covers QR placements and campaign measurement.
Update details without reprinting
Change the venue or instructions and select Update live page. The page link and printed QR stay the same. Contact existing respondents separately about important changes.
For an offline revision, choose Pause page before editing. Save while paused, then select Make live. Visitors cannot open the paused page. People who already have it open need to reload to see an update.
For a separate event, use Duplicate, or save the design as a template and reuse it from New page, then My templates. The new draft gets its own QR and link; previous replies and visits stay with the original. Read about saved templates, lead follow-up and Page analytics for the repeat-event workflow.
Check your response allowance
Free includes 3 shared Pages and QR code slots, 2 photos per page and 10 form submissions per UTC calendar month. The response allowance is shared across the owner's pages and workspaces, including test submissions. Drafts and paused pages use slots; sample photos count toward the photo limit.
At the lead limit, the form displays a paused notice and stops accepting replies while the rest of the page stays available. Check the current plan allowances before inviting more people. Existing responses remain in Leads.
Start with the workshop template and adapt the invitation to your event.
FAQ
Can I make an RSVP QR code for free?
Yes. All three event templates are available on Free, within its shared slot and monthly submission allowances. Free Pages include a Scanely footer.
Can guests reply without a Scanely account?
Yes. They open the published page and submit the form with an email address and consent. A Scanely account is not required.
Does an RSVP submission confirm a booking?
No. It records a response for you to review. You handle availability, confirmations and payment separately.
Can I change the event after printing the QR?
Yes. Update the existing Page and keep the same printed QR. Guests who already replied need a separate message about important changes.